Wednesday 30 November 2022

Well Hello There!

After a lot of head Scratching and help from my lovely friend Helen I have managed to get back into this blog! It's been a very long time, I have been wanting to come back for ages but knew it would be a hassle and it was! Anyway enough of my waffle. Tomten Village has arrived and this time its not just fabric, there are placemats, bunting, cushion covers, stockings and a beautiful advent calendar.
The Advent Calendar and the placemats do not have instructions so I decided to make them and put the instructions on here.
I first pressed the advent panel. Cut the panel pockets out leaving a quarter inch seam allowance. Press the sides of each pocket over to hide raw ends and then the top and bottom. Stitch the top hem down. Decide on the order in which the pockets are placed. I wanted random. I then pinned them to the backing panel and stitched each pocket down. I started at one side and did the bottom and then the other side leaving the top open.
Once all the pockets are stitch to the backing panel I then made it into a quilt sandwich. I added wadding and picked Tomten Village houses to have on the back. I made a quilt sandwhich. House fabric facing down, added the wadding and then added the advent top. I decided to quilt it with a star stitch along each of the pocket rows.
Once it was quilted I trimmed the advent around the edges and the picked a binding fabric. Liberty Wiltshire in Ruby picked out the red of the Tomten coat. I added a tube of fabric on the back so I can add some dowling to hang the advent up I always like to machine sew the first part of the binding down and then hand sew the second part as I hate seeing stitches showing on the front side. I love the process of finally sitting down with a cuppa and gently sewing the binding on and admiring my work!
I just need to fill it with treats for advent now! The placemats were just like mini quilts. I added Star fabric border to each placemat as I wanted the placemats larger. I then added wadding and backing fabric and then quilted in the ditch on each mat. If I wasn't pushed for time I would have liked to have quilted around the different images on each mat. I couldn't decide on binding. I had picked out stripe fabric in red and then a spot fabric. In the end I decided to do three in each. The mats are all finished now and will be used for Christmas.
I started writing this over 6 weeks ago and have only got round to pressing publish! I will say bye for now and I'm hoping to post another blog next week. Wishing you a lovely start to Advent. Take care, much love xx

Tuesday 16 April 2019

Hello, Well I have dusted this blog after it took me about an hour trying to get back into it! Everything has changed so it will be trial and error and a huge amount of reading so I can make this blog interesting! It would be impossible for me to talk about everything that has happened since I last posted on here so I'm just going to start a fresh.
You me and Mabel has been growing and lots of new fabrics have been added. Stu and I did a pop up shop at the weekend which was really good fun. Unfortunately I forgot to take any photos! I'm going to keep this post short for now (not sure if it will publish) I want to wish you a lovely Easter if you celebrate it, and wishing everyone a lovely four day weekend if you are lucky enough to be off work, the weather looks like it is going to be good. I plan to garden and get lots of jobs done, as Stu is working most of it. Happy Sewing!

Wednesday 17 May 2017


Hello, I'm back! I have been meaning to blog so many times but for some reason me and blogging just couldn't meet up together. But now I'm back and I am going to try and blog more regularly and show all the things I have been up too, and all the lovely fabrics that are arriving here at You me and Mabel.

Firstly I had to share a photo of a beautiful Allium from my garden. We planted the bulbs last year and we have eight of the beauties smiling away in the garden. Can you see the Bumble Bee? When it's not rainy I love sitting outside and watching them. Such busy little bees.


Norman the Gnome is very happy in the garden


Lovely fabrics have been arriving into the You me and Mabel. Confetti by Dashwood Studio was so lovely I decided to make some cushions and a quilt for the lounge.


Confetti Collection
Squares and half square triangles

A little applique


Lots of pins needed to baste the quilt

I did  simple diagonal quilting from corner to corner

This always seems to happen!

Photo bombing!


I was really happy with the way the quilt and six cushions all turned out. The fabrics are available in my shop.

Other lovely fabrics and patterns have arrived including.....

Birdsong by Dashwood Studio

Two cushions for my Dad

I backed the cushions in Robert Kaufman Chambray.

Gorgeous patterns by Two Stitches

Lots of  new bundles have been added 


I love supporting other independent sellers and was lucky enough to snag a beautiful notions pouch by Indigochicken This beautiful pouch has travelled across the pond and I adore it. 

Made by the talented Deborah
I entered a Kal (knitalong) this spring, The shawl was made with lovely Norah George Yarns and its the first time I knit lace work! Stitch markers were my friend and helped me stay on track.


A bucket full of treasured yarn
My lovely friend Lindsey wants to learn crochet so we have been having little teaching sessions. Lindsey is doing really well. I made her a project bag for her birthday and put some yarns in it.


Lindsey had an open weekend to celebrate the opening of her new studio/shop where she sells the most gorgeous candles and other lovely things. I was really delighted to see the quilt I made her for her birthday last year out on show.


Auriculas

Bluebells and Acers

I love this collection of pots and plants
The fragrances are divine

Do you see the owl? Yep another of my makes!
Well I'm off now to walk Mabel, and I promise to blog next week. Thank you reading, happy sewing, knitting and crafting. 

Love Sally

Monday 19 September 2016

Festive Friends Advent Calendar by Dashwood Studio


I have lots to write about and will post all about Summer soon but for now I'm jumping straight into Christmas! Well not actually but Christmas Sewing and getting prepared. 

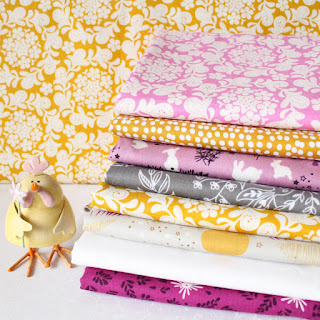
Festive Friends by Dashwood Studio (dashwoodstudio.com) designed by Aless Baylis is a cute cheerful advent calendar that can be made and used year after year.
It comes as a panel with instructions on it, (in blue) It's available on my website youmeandmabel.co.uk with lots of gorgeous co-coordinating fabric too!
The instructions written remind me a little of a technical challenge on The Great British Bake Off! They are there but if you have not made one before or have limited sewing knowledge you might struggle with it a little!

I have included lots of photos to help along the way. The photos aren't the greatest as when I made the calendar it was a dark grey rainy day so lighting wasn't the best and I'm not a processional photographer.

Okay lets get going.
Grab a cuppa and a biscuit, remember to enjoy sewing and it doesn't have to be perfect so have fun with it.

1, Cut out the back panel following the outer of the green seam allowance.

I gave the panel a press to start with and then used my rotary cutter so I got nice straight edges, scissors are fine if you don't own a cutter.

2, Cut out the pocket strips around the outer edge of the cream seam allowance. 
Again I used my rotary cutter but scissors are fine if you do not have a rotary cutter.

3, Press over the seam allowance on the top edge of each pocket strip and stitch.
It doesn't give a seam allowance so it's up to you. I double folded my hem so there was no rough ends and then stitched a very narrow seam allowance.
4, Make a box pleat between each pocket by bringing the sides together to meet the dotted line.
I folded one edge first, pressed it and then did the second edge, pressed again and then I popped a pin in at the top of each pocket to keep the pleat in place.
 Pin each pocket stops it from moving.
5, Press and tack the side and bottom seam allowances on each pocket strip. 
Now I was very good and did tack, I was tempted to just leave pins in place but I was good and tacked all the strips, and I'm pleased I did as it made sewing it so much easier and stopped any major movement.
6, Pin each pocket strip to the back panel and tack in place.
I tacked down the middle of each pleat where the dotted line is and then down the two side ends and along the bottom. It took a while but it does make life easier in the end. I always use a thread that shows up so I can see the tack stitches.
7, Stitch the pocket strips onto the back panel.
To do this I first stitched down the dotted lines in between the pleats. I started at the top of each one and went backwards and forwards several times just at the top as I wanted to add some strength as the pockets will be getting lots of  use! Once they are stitched I then started at top of the edge of either left or right pocket strip (it doesn't matter which) and stitched all the way down one side along the bottom and then back up the other edge of pocket strip.I took my time and made sure all my pleats lay flat so as I stitched over the bottom the pleats stayed in place.


8, Layer the panel with wadding to give some body and choose a co-ordinating Christmass pattern to back the panel with. Quilt the panel as desired.
Firstly I pressed the pocket strips then removed all my tacking stitches. I used a fat quarter 55cm x 50cm to back my panel with. Placing the Fat Quarter right side face down then the wadding and the advent calendar on top face up. I put a few pins in place to stop it moving, but you can use spray or tacking stitches.
I started in the middle and stitched around on the white, I decided as Phoebe my Pfaff has pretty stitches, to use a star stitch. Once all the middle was stitched I then went all around the green border.
 I decide red festive friends snowflake fabric would be perfect for the binding.
I decided on 2 1/2 inch binding was wide enough. To join the binding together, place one strip face up then the other strip face down as photo.
Draw a diagonal line across the top and mark it. I used a friction pen which will disappear with heat. Stitch on the line and trim away the excess.
 Fold the binding in half with wrong sides together and press.
Place the binding with raw edge of binding against the raw edge of calendar. Start sewing half way down. Leaving a good few inches of binding at the start.

When you get to a corner stop. Then fold the binding up and then back over again. See photo below.
                                 
Once you get to the last edge near to where you started stop. Leaving a few inches unsewn. Trim off any extra binding so the binding overlaps by two inches. Fold the bottom binding over diagonally so its at 45 degree angle. Pop a pin in place to stop it moving and then place the top binding over it and stitch in place. If you have a different way of binding then please do it your way.
Once the binding is all stitched, fold the binding over on to the back of the calendar and hand stitch into place. This is my favourite part of sewing. It's gentle and slow and a good chance to sit and watch some TV knowing your project is nearly finished!

9, Make loops or a sleeve along the edge of the panel to hang the finished calendar.
 I decided to just sew two little loops on the back using some striped ribbon from my stash.


Try not to fill with treats just yet until the 30th of November as if you are like me you will only eat them!!!